Install ELK 8.4.1 with fleet server using docker compose
Published:
Hi, I will deploy ELK stack in docker environment. Architecture proposed in this deployment contains two docker stacks. First stack will generate certificates for elastic servers. Second will be elastic stack components: Elasticsearch, kibana and fleet server.
All bellow definition for docker compose is modified solutions from elastic documentation, available at:
https://www.elastic.co/guide/en/elasticsearch/reference/current/docker.html - Elasticsearch
https://www.elastic.co/guide/en/kibana/current/docker.html - Kibana
https://www.elastic.co/guide/en/fleet/current/elastic-agent-container.html - Fleet Server
Docker compose configuration for first stack:
version: '3'
services:
  setup:
    user: "0"
    image: docker.elastic.co/elasticsearch/elasticsearch:8.4.1
    volumes:
      - /docker/es/config/certs/:/usr/share/elasticsearch/config/certs
    command: >
      bash -c '
        if [ ! -f config/certs/ca.zip ]; then
          echo "Creating CA";
          bin/elasticsearch-certutil ca --silent --pem -out config/certs/ca.zip;
          unzip config/certs/ca.zip -d config/certs;
        fi;
        if [ ! -f config/certs/certs.zip ]; then
          echo "Creating certs";
          echo -ne \
          "instances:\n"\
          "  - name: es\n"\
          "    dns:\n"\
          "      - es\n"\
          "      - localhost\n"\
          "    ip:\n"\
          "      - 127.0.0.1\n"\
          "      - 192.168.0.6\n"\
          "      - 192.168.20.2\n"\
          > config/certs/instances.yml;
          bin/elasticsearch-certutil cert --silent --pem -out config/certs/certs.zip --in config/certs/instances.yml --ca-cert config/certs/ca/ca.crt --ca-key config/certs/ca/ca.key;
          unzip config/certs/certs.zip -d config/certs;
        fi;
        echo "Setting file permissions"
        chown -R root:root config/certs;
        find . -type d -exec chmod 750 \{\} \;;
        find . -type f -exec chmod 640 \{\} \;;
        echo "All done!";
      '
    healthcheck:
      test: ["CMD-SHELL", "[ -f config/certs/es/es.crt ]"]
      interval: 1s
      timeout: 5s
      retries: 120
    network_mode: "host"
Most important changes:
Line 5: you must provide version of elasticsearch image which will comply to your planned environment. I will use latest version 8.4.1.
Line 18-26: configuration for certificates. I will use them in elasticsearch, kibana and fleet configuration. I must put all host names and ip addresses what will be added to certificate. It is very important to put all of them to let elasticsearch servers to communicate with each other.
Be sure to create all paths from section Volumes before deploying stack.
In my deployment I will use single server solution for lab purposes. Because of that I am declaring only one server in instances section of configuration file.
To generate more instances, you must simple add another instances of servers:
          "instances:\n"\
          "  - name: es1\n"\
          "    dns:\n"\
          "      - es\n"\
          "      - localhost\n"\
          "    ip:\n"\
          "      - 127.0.0.1\n"\
          "      - 192.168.0.7\n"\
          "  - name: es2\n"\
          "    dns:\n"\
          "      - es\n"\
          "      - localhost\n"\
          "    ip:\n"\
          "      - 127.0.0.1\n"\
          "      - 192.168.0.8\n"\
After running this deployment, we should receive certificates in path defined in line 7: /docker/es/config/certs/
You can change this path to fit your naming convention. After checking all certificates files ca.cert, ca.key, es.key, es.crt are generated I will not need this stack anymore, so I keep it disabled.
Second stack will consist of three containers: elasticsearch, kibana and fleet server.
In first step I will deploy core containers: elasticsearch and kibana. After that I will edit config file and add fleet server for first deployment. I must do this like that, because kibana has to generate tokens for fleet server and for me it is easier to make it work.
Stack docker compose configuration:
version: '3'
services:
  es:
    image: docker.elastic.co/elasticsearch/elasticsearch:8.4.1
    container_name: es
    environment:
      - node.name=es
      - cluster.name=elk
      - discovery.type=single-node
      - bootstrap.memory_lock=true
      - "ES_JAVA_OPTS=-Xms2g -Xmx2g"
      - network.host=192.168.20.2
      - http.port=9200
      - xpack.security.enabled=true
      - xpack.security.http.ssl.enabled=true
      - xpack.security.http.ssl.key=es.key
      - xpack.security.http.ssl.certificate_authorities=ca.crt
      - xpack.security.http.ssl.certificate=es.crt
      - xpack.security.transport.ssl.enabled=true
      - xpack.security.transport.ssl.verification_mode=certificate
      - xpack.security.transport.ssl.certificate_authorities=ca.crt
      - xpack.security.transport.ssl.certificate=es.crt
      - xpack.security.transport.ssl.key=es.key
#    ulimits:
#      memlock:
#        soft: -1
#        hard: -1
#      nofile:
#        soft: 65535
#        hard: 65535
    volumes:
      - /docker/es/data/:/usr/share/elasticsearch/data
      - /docker/es/config/certs/es/es.crt:/usr/share/elasticsearch/config/es.crt
      - /docker/es/config/certs/es/es.key:/usr/share/elasticsearch/config/es.key
      - /docker/es/config/certs/ca/ca.crt:/usr/share/elasticsearch/config/ca.crt
      - /docker/es/logs:/usr/share/elasticsearch/logs
    restart: always
    network_mode: "host"

  kib:
    image: docker.elastic.co/kibana/kibana:8.4.1
    container_name: kib
    environment:
      ELASTICSEARCH_URL: "https://192.168.20.2:9200"
      ELASTICSEARCH_HOSTS: '["https://192.168.20.2:9200"]'
      ELASTICSEARCH_USERNAME: "kibana_system"
      ELASTICSEARCH_PASSWORD: "kibana_system_password"
      XPACK_MONITORING_ENABLED: "true"
      XPACK_MONITORING_COLLECTION_ENABLED: "true"
      XPACK_ENCRYPTEDSAVEDOBJECTS_ENCRYPTIONKEY: "32characterKey32characterKey1234"
      XPACK_REPORTING_ENCRYPTIONKEY: "32characterKey32characterKey1234"
      ELASTICSEARCH_SSL_CERTIFICATEAUTHORITIES: /usr/share/kibana/config/ca.crt
      SERVER_PORT: '5601'
      ELASTICSEARCH_REQUESTTIMEOUT: 300000
    volumes:
      - /docker/es/config/certs/ca/ca.crt:/usr/share/kibana/config/ca.crt
    restart: always
    network_mode: "host"
Most important changes:
Line 7: I changed version of elsaticsearch image what fit my environment.
Line 11: I use 2GB of ram for my server what is enough to get logs from my lab and keep them for last month.
Line: 12-13: I put in configuration information on what IP and port elasticsearch will run. It is important because of my lab configuration. I do not want let elastic to be visible in some networks. It can be also done by providing interfaces on what it will be visible.
Line 14-23: I had to configure certificates for elasticsearch web services and between server communication. I put there names of certificates what were generated by first stack. Paths to these files are defined in lines 33-35. This is very important, and it will be checked when we deploy more than one server, or I will use cross cluster search feature.
Lines 24-30: In my lab setup I had to disable limits configuration. In VM or hardware deployment you should remove # mark from each line.
In configuration of second container kibana I made also some changes:
Line 41: I changed version of kibana image what fit my environment.
Line 44-45: I put IP address to let kibana know where elasticsearch server is located. It is important to setup HTTPS connection.
Line 46-47: I setup user and password for kibana in elasticsearch. This password will be setup later in guide.
Line 51-52: I must put in configuration 32-character long encryption key for encryption of security objects in elasticsearch. Save those keys, because in case of losing them you will not be able to access current security data stored in elasticsearch database.
Line 53: I had to configure ca certificates for Kibana. It is important, because I would like to let kibana check if elasticsearch is presenting certificate signed by CA certificate what was provided in config.
Be sure to create all paths from section Volumes before deploying stack.
You should be able to start this stack now.
After elasic container is UP I changes passwords for users kibana and elastic:
docker exec -it es /usr/share/elasticsearch/bin/elasticsearch-reset-password -u elastic -i
docker exec -it es /usr/share/elasticsearch/bin/elasticsearch-reset-password -u kibana_system -i
Remember to change container name es to your name. Remember to put password in compose configuration in kibana container configuration, after that restart both containers.
Stack is running. I check with basic curl requests.
Elasticsearch:
curl https://elastic:password@192.168.20.2:9201 --insecure
{
  "name" : "es",
  "cluster_name" : "elk",
  "cluster_uuid" : "7yrt6za8QoezNhCCnLASUg",
  "version" : {
    "number" : "8.4.1",
    "build_flavor" : "default",
    "build_type" : "docker",
    "build_hash" : "2bd229c8e56650b42e40992322a76e7914258f0c",
    "build_date" : "2022-08-26T12:11:43.232597118Z",
    "build_snapshot" : false,
    "lucene_version" : "9.3.0",
    "minimum_wire_compatibility_version" : "7.17.0",
    "minimum_index_compatibility_version" : "7.0.0"
  },
  "tagline" : "You Know, for Search"
}
Kibana:
curl http://192.168.20.2:5602/login -v
* Expire in 0 ms for 6 (transfer 0x55dc229f30f0)
*   Trying 192.168.20.2...
* TCP_NODELAY set
* Expire in 200 ms for 4 (transfer 0x55dc229f30f0)
* Connected to 192.168.20.2 (192.168.20.2) port 5602 (#0)
> GET /login HTTP/1.1
> Host: 192.168.20.2:5602
> User-Agent: curl/7.64.0
> Accept: */*
>
< HTTP/1.1 200 OK
Now we can go and generate token for fleet server.
I navigated to kibana web site and login as elastic user. Password was generated in previous step. I navigated in kibana: menu > Management > Fleet.
Kibana is asking for configuration for fleet server.
First Step: Get started with Fleet Server
For my lab, fleet server will be deployed in same docker as rest of stack. I provided:
Fleet Server Host: https://192.168.20.2:8220 and clicked button: Generate Fleet server Policy.
Second Step: Install Fleet Server to a centralized host
Kibana generated Fleet Server Token:
curl -L -O https://artifacts.elastic.co/downloads/beats/elastic-agent/elastic-agent-8.4.1-linux-x86_64.tar.gz
tar xzvf elastic-agent-8.4.1-linux-x86_64.tar.gz
cd elastic-agent-8.4.1-linux-x86_64
sudo ./elastic-agent install \
  --fleet-server-es=http://localhost:9200 \
  --fleet-server-service-token=AAEAAWVsYXN0aWMvZmxlZXQtc2VydmVyL3Rva2VuLTE2NjIxOTc5ODg0Njg6bTh1YUwxVDJUX0s1Rmsxd0FQa0czZw \
  --fleet-server-policy=fleet-server-policy
I will not install elastic agent in host. I will use docker image and deploy it with docker service but will use generated token - Line 6.
I added config for fleet server to my docker stack configuration:
  fleet-server:
    image: docker.elastic.co/beats/elastic-agent:8.4.1
    container_name: fleet-server
    restart: always
    user: root # note, synthetic browser monitors require this set to `elastic-agent`
    environment:
      - FLEET_ENROLL=0
      - FLEET_INSECURE=1
      - FLEET_URL=https://192.168.20.2:8220
      - FLEET_SERVER_ENABLE=true
      - FLEET_SERVER_ELASTICSEARCH_HOST=https://192.168.20.2:9200
      - FLEET_SERVER_SERVICE_TOKEN=AAEAAWVsYXN0aWMvZmxlZXQtc2VydmVyL3Rva2VuLTE2NjIxOTc5ODg0Njg6bTh1YUwxVDJUX0s1Rmsxd0FQa0czZw
      - ELASTICSEARCH_CA=/usr/share/fleet/config/ca.crt
      - FLEET_CA=/usr/share/fleet/config/ca.crt
      - CERTIFICATE_AUTHORITIES=/usr/share/fleet/config/ca.crt
      - FLEET-SERVER-CERT=/usr/share/fleet/config/es.crt
      - FLEET-SERVER-CERT-KEY=/usr/share/fleet/config/es.key
    volumes:
      - /docker/es/config/certs/ca/ca.crt:/usr/share/fleet/config/ca.crt
      - /docker/es/config/certs/es/es.crt:/usr/share/fleet/config/es.crt
      - /docker/es/config/certs/es/es.key:/usr/share/fleet/config/es.key
    network_mode: "host"
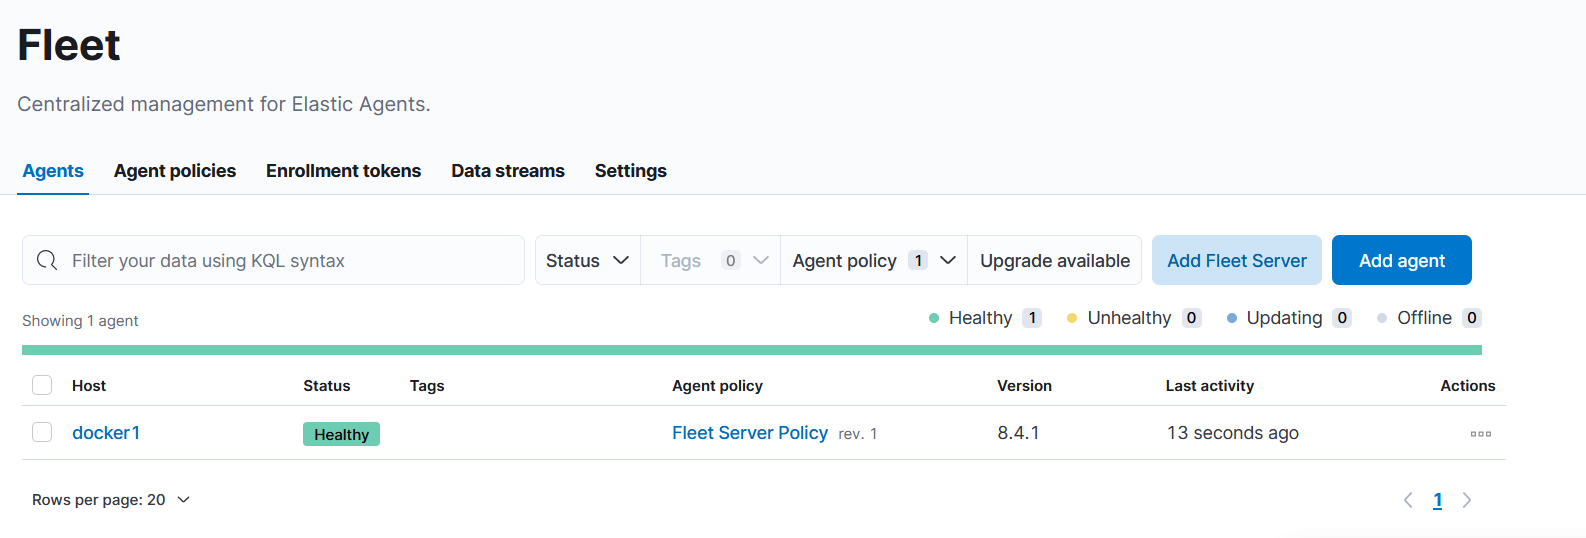
After that I restarted stack. After a while, I could login to kibana and in fleet configuration page i noticed that fleet server was added with heal status updating. After few moments it was green healthy.
Next step for fleet server to work and let agents to ship logs in elasticsearch I had to put certificates for “output to elasticsearch”.
On page fleet I navigated to settings to configure fleet settings.
In section output I had to edit elasticsearch default output. I put IP address of my elasticsearch server using HTTPS protocol and in section Advanced YAML configuration I pasted content form file ca.crt - certificate generated when I started first stack.
To get it I used commands:
cat /docker/es/config/certs/ca/ca.crt
-----BEGIN CERTIFICATE-----
xxxx certificate  information xxxx
xxxxxxxxxxxxxxxxxxxxxxxxxxxxxxxxxx
xxxxxxxxxxxxxxxxxxxxxxxxxxxxxxxxxx
-----END CERTIFICATE-----
Having this information I could copy it to configuration:
in section Advanced YAML configuration I pasted content:
ssl:
  certificate_authorities:
  - |
    -----BEGIN CERTIFICATE-----
    xxxx certificate  information xxxx
    xxxxxxxxxxxxxxxxxxxxxxxxxxxxxxxxxx
    xxxxxxxxxxxxxxxxxxxxxxxxxxxxxxxxxx
    -----END CERTIFICATE-----
This configuration will be provided to agents deployed in environment and because it is YAML, the align is very important. There are two spaces before “certificate_authorities” and four spaces before —–BEGIN CERTIFICATE—– and rest lines of certificate.
Now I have running server with elasticsearch, kibana and fleet server.
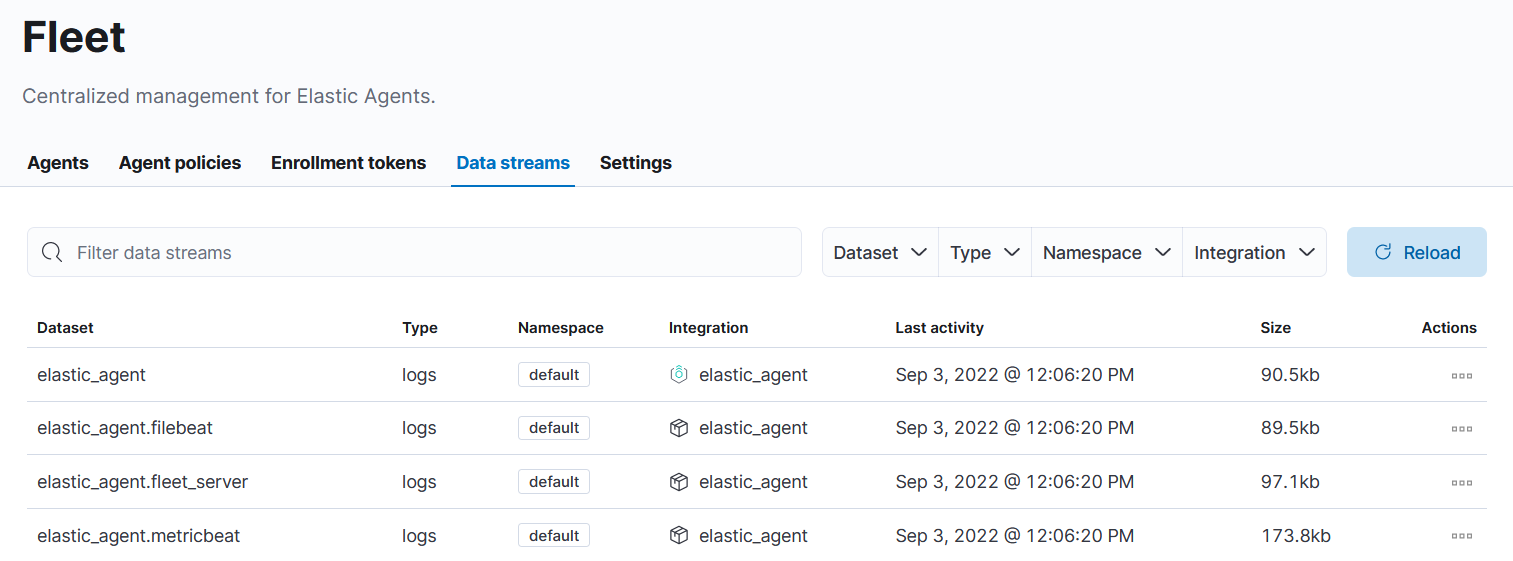
To check I navigated to data_streem section of Fleet page and you should get new data streams:
Now I have all setup and running. Next I will configure agents for linux and windows, to start collecting logs from devices using elastic agent integrations.
You all have a nice collecting :)

